Batch Embedding Jobs with the Embed API
This Guide Uses the Embed Jobs API.
You can find the API reference for the api here
The Embed Jobs API is only compatible with our embed v3.0 models
In this guide, we show you how to use the embed jobs endpoint to asynchronously embed a large amount of texts. This guide uses a simple dataset of wikipedia pages and its associated metadata to illustrate the endpoint’s functionality. To see an end-to-end example of retrieval, check out this notebook.
How to use the Embed Jobs API
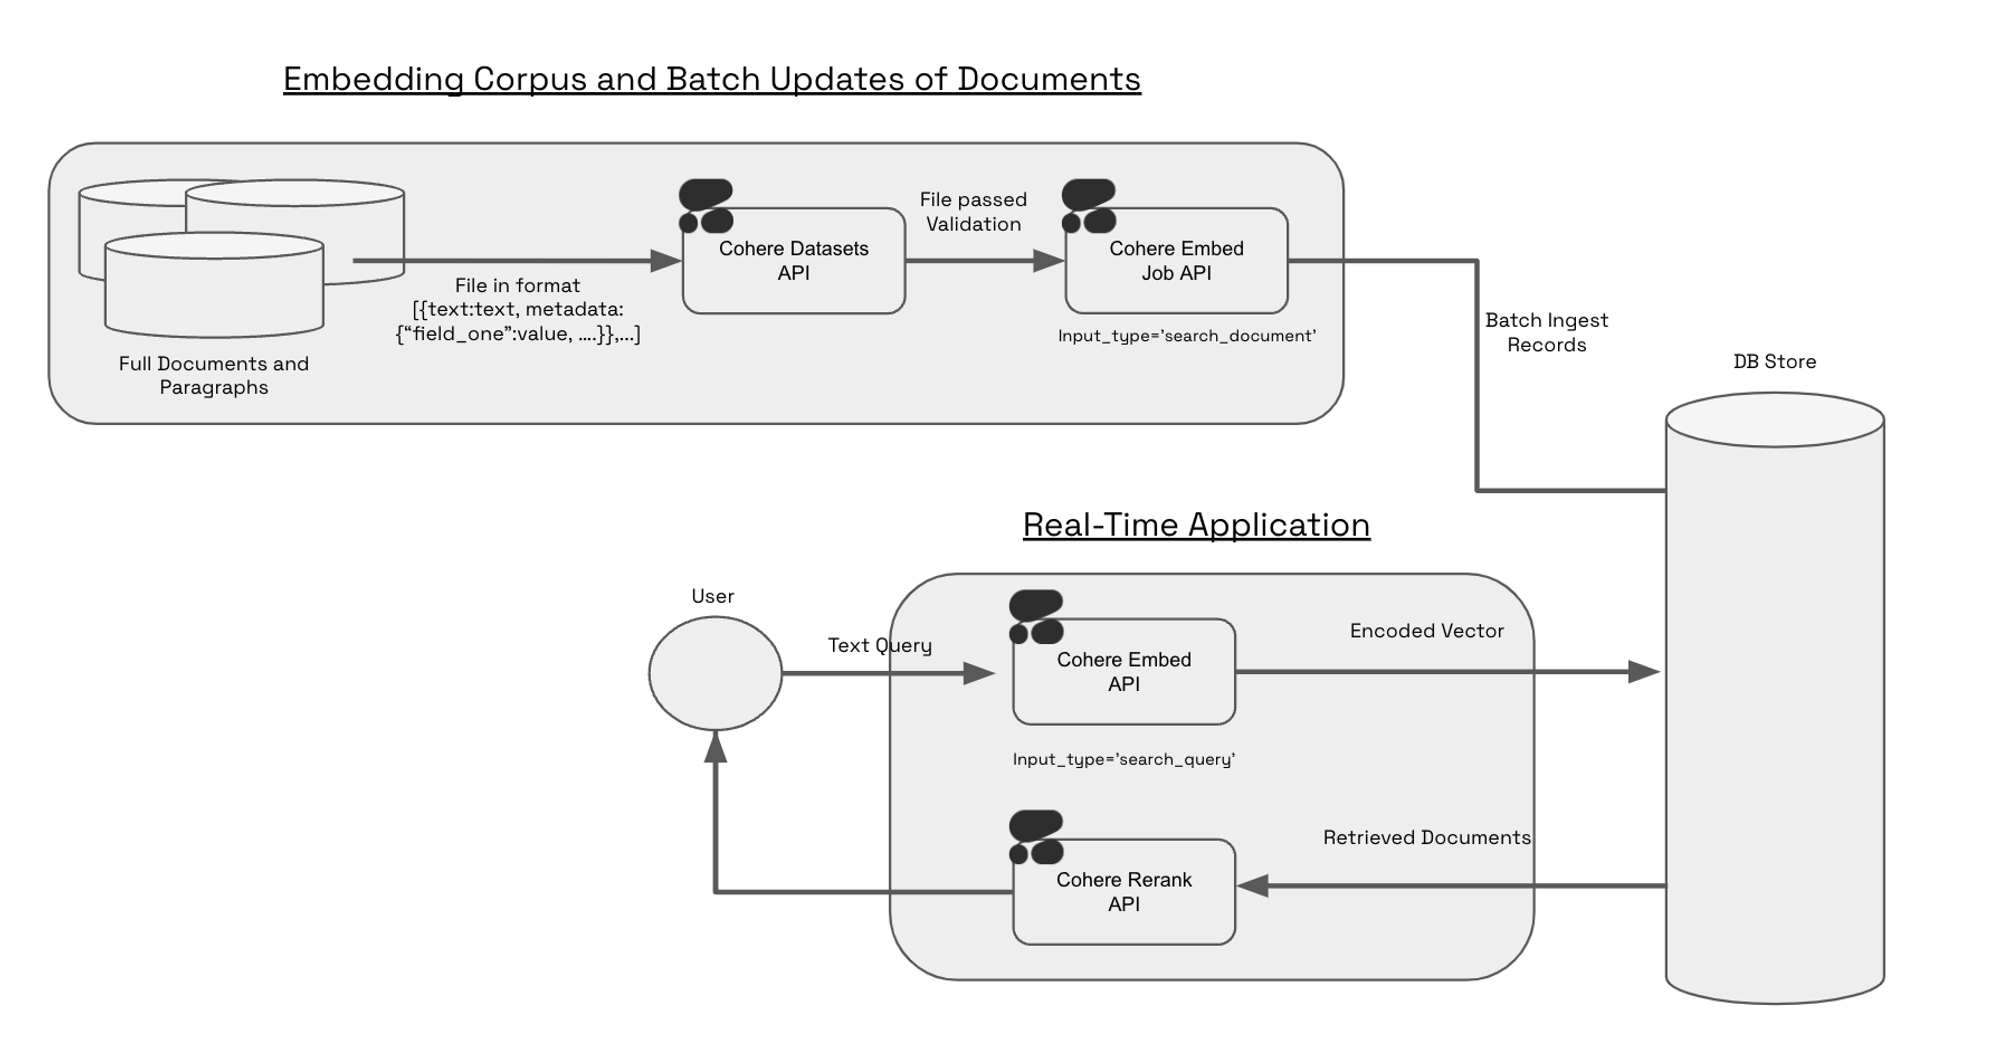
The Embed Jobs API was designed for users who want to leverage the power of retrieval over large corpuses of information. Encoding hundreds of thousands of documents (or chunks) via an API can be painful and slow, often resulting in millions of http-requests sent between your system and our servers. Because it validates, stages, and optimizes batching for the user, the Embed Jobs API is much better suited for encoding a large number (100K+) of documents. The Embed Jobs API also stores the results in a hosted Dataset so there is no need to store the result of your embeddings locally.
The Embed Jobs API works in conjunction with the Embed API; in production use-cases, Embed Jobs is used to stage large periodic updates to your corpus and Embed handles real-time queries and smaller real-time updates.
Constructing a Dataset for Embed Jobs
To create a dataset for Embed Jobs, you will need to set dataset type as embed-input. The schema of the file looks like: text:string.
The Embed Jobs and Dataset APIs respect metadata through two fields: keep_fields, optional_fields. During the create dataset step, you can specify either keep_fields or optional_fields, which are a list of strings corresponding to the field of the metadata you’d like to preserve. keep_fields is more restrictive, since validation will fail if the field is missing from an entry. However, optional_fields, will skip empty fields and allow validation to pass.
Sample Dataset Input Format
As seen in the example above, the following would be a valid create_dataset call since langs is in the first entry but not in the second entry. The fields wiki_id, url, views and title are present in both JSONs.
Currently the dataset endpoint will accept .csv and .jsonl files - in both cases, it is imperative to have either a field called text or a header called text. You can see an example of a valid jsonl file here and a valid csv file here.
1. Upload your Dataset
The Embed Jobs API takes in dataset IDs as an input. Uploading a local file to the Datasets API with dataset_type="embed-input" will validate the data for embedding. Dataset needs to contain text field. The input file types we currently support are .csv and .jsonl. Here’s a code snippet of what this looks like:
Upon uploading the dataset you will get a response like this:
Once the dataset has been uploaded and validated you will get a response like this:
If your dataset hits a validation error, please refer to the dataset validation errors section on the datasets page to debug the issue.
2. Kick off the Embed Job
Your dataset is now ready to be embedded. Here’s a code snippet illustrating what that looks like:
Since we’d like to search over these embeddings and we can think of them as constituting our knowledge base, we set input_type='search_document'.
3. Save down the Results of your Embed Job or View the Results of your Embed Job
The output of embed jobs is a dataset object which you can download or pipe directly to a database of your choice:
Alternatively if you would like to pass the dataset into a downstream function you can do the following:
Sample Output
The Embed Jobs API will respect the original order of your dataset and the output of the data will follow the text: string, embedding: list of floats schema, and the length of the embedding list will depend on the model you’ve chosen (i.e. embed-v4.0 will be one of 256, 512, 1024, 1536 (default), depending on what you’ve selected, whereas embed-english-light-v3.0 will be 384 dimensions).
Below is a sample of what the output would look like if you downloaded the dataset as a jsonl.
If you have specified any metadata to be kept either as optional_fields or keep_fields when uploading a dataset, the output of embed jobs will look like this:
Next Steps
Check out our end to end notebook on retrieval with Pinecone’s serverless offering.